
- Like
- SHARE
- Digg
- Del
- Tumblr
- VKontakte
- Flattr
- Buffer
- Love This
- Save
- Odnoklassniki
- Meneame
- Blogger
- Amazon
- Yahoo Mail
- Gmail
- AOL
- Newsvine
- HackerNews
- Evernote
- MySpace
- Mail.ru
- Viadeo
- Line
- Comments
- Yummly
- SMS
- Viber
- Telegram
- JOIN
- Skype
- Facebook Messenger
- Kakao
- LiveJournal
- Yammer
- Edgar
- Fintel
- Mix
- Instapaper
- Copy Link
Introduction
Some of the most common upper body exercises also happen to be some of the most effective exercises, when it comes to building muscle and pure strength. We’re talking pull-ups and push-ups!
If you’re ready to take your upper body game (and muscles) to new levels, mastering and consistently utilizing these fantastic upper body exercises is a must.
Out of all the questions we receive here at AskTheTrainer.com, how to get better at a particular exercise sits high on the list. This detailed how-to guide is for all of you.
Enjoy!
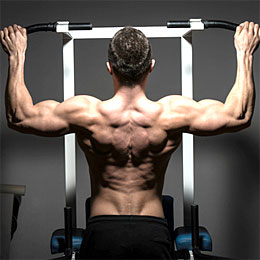
How to Get Better at Pull-Ups
Pull-ups are the legendary great grandmama of all exercises. Few exercises are as honest as the pull-up; you simply can’t fake your way through it.
A crappy pull up really shows from across the gym, and you will feel the lack of success loudly in the lack of your lagging gains. Mostly, they are humbling….
When I have taken a decent amount time off from the gym and I try (unsuccessfully) to hit my old pull up programming standards…well, nothing makes me bow down to the gravity gods with more earnestness!
On the other hand, there are few things more badass than competent strict pull ups, executed with proper form and at the right rhythm. And yes, that means no kipping! Which brings me to tip number one for getting better at pull-ups…don’t kip!
Tip One: No Kipping!!
Thou shalt not kip, with a couple exceptions: if you’re a trained gymnast or highly competent in calisthenics, kip away all day and I will refrain from criticism. Kipping is required in order to perform many advanced gymnastics and calisthenics movements….and that’s great! But if you are simply looking to use pull ups to improve overall athleticism, back strength, and back muscle size and tone, avoid the kipping maneuver. Kipping should only be practiced by those who are ALREADY able to do several strict pull ups in a row.
At best, relying on the kip will rob you of any real gains pull-ups are meant to accomplish, and at worst, you will wreck your shoulder joints, which are not meant to sustain the forces encountered in kipping without significant preparation and coaching. I have seen the latter all too often in clients transitioning from Crossfit back to more traditional forms of fitness training.
If you don’t know, kipping refers to using the weight of your body to create momentum and swinging your way to to the top of the bar instead of using your back, arm, and core muscles properly. Kipping pull ups are popular in the Crossfit world, I think mostly to make pull ups more accessible to folks who want to look cool, but who have not yet achieved the level of strength required to accomplish actual strict pull ups.
Don’t cheat. Invest the time and energy required to learn true pull up form and develop the strength to knock out solid sets. Your shoulder joints will thank you!
Tip 2: Focus on the Negative
If you’re struggling to get your first pull up or simply want to get more reps, here is a neat trick for you. It’s not that often in life that we get encouraged to focus on the negative, right? Well, in this case, focusing on the negative is a good thing. To do a negative pull up, get a boost up to the top position, hang for a second with flexed arms and fully engaged lats, then lower yourself down to the starting position as slowly as possible.
Our muscles are able to sustain higher loads on the negative portion of a lift, which is also known as the eccentric or lowering phase. By getting assistance with the harder (concentric or raising) part of the lift and completing the easier part under your own steam, you can introduce more overload to your muscles in a safer way and cause them to adapt more quickly.
There are a few different ways to do negative pull ups: (1) use the pull up assist machine to push you to the top position with whatever level of assistance you need, (2) use a monster band looped over the pull up handles, (3) have a buddy push your feet upward, (4) get a box or sturdy chair and climb to the top position, or (4), simply jump to the top position if the bar is low enough. Whatever boost you choose, just make sure that you lower yourself very slowly, taking at least three to four seconds to hit bottom. And never, ever, let your shoulder joints be lax in the bottom position. Keep the heads of your upper arm bones plugged into the shoulder sockets and your shoulders pressed down away from your ears at all times.
Tip 3: Do Complementary Exercises
Specificity in your practice tends to be the number one key to getting better at any skill, and getting better at pull ups is no exception. However, there are several different complementary moves you can perform in addition to practicing pull ups themselves in order to round out the muscles and motor patterns required to perform pull ups.
To get good at pull ups, you need not only strong latissimus dorsi muscles, but strong biceps, core, grip, and even hips. Your core and hips need to be able to lock down and stabilize your trunk while your lats, biceps, and grip muscles do the heavy lifting. So functional movements that hammer on these areas will go a long way toward improving all the pieces that go into a solid pull up.
For lats, biceps, grip, core, hips, and overall pulling strength (OK, all the areas I just mentioned) add a few sets of 10 supine rows into your fitness plan. Working on your horizontal bodyweight pulling skills (rows) translates well over to your vertical pulling skills (pull ups). Barbell and dumbbell bent over rows are also helpful for building raw strength and stability.
For core and hips stability make sure you do your planks. If you can hold a plank for 60 seconds with no problems, introduce plank variations such as one arm planks, stability ball planks, etc., as well as more advanced core exercises such as stability ball pike crunches.
For biceps you can do biceps curl variations such supinating curls and hammer curls, but I don’t recommend spending much if any time on biceps isolations unless you also have the specific goal of building your biceps for aesthetic reasons. If you’re doing plenty of pull ups, rows, and other compound exercises like deadlifts, your biceps will pretty much take care of themselves.
Speaking of deadlifts, this might sound weird since they seem so lower-body dominant, but deadlifts will help your pull ups. Think about it: even though they are not moving much during the if your lats were not contracting like mad during your deadlifts, your shoulders would be yanked right out of their sockets and the bar would never leave the ground. Your lats develop a lot of strength and stability during deadlifts, as do the many stabilizing muscles of your shoulder complex. The only possible downside to the relationship between deadlifts and pull ups is that deadlifts will add a good deal of muscle to your lower back, glutes, and thighs, meaning you will have a heavier resistance to work against during your pull ups since you are required to pull your bodyweight.
For grip and core, try the farmer’s walk. Just grab a heavy dumbbell or kettlebell in one or both hands and walk around like a farmer carrying slop to the hogs. Yes, this is a real thing. Try it with a heavy enough weight and you will really feel it!
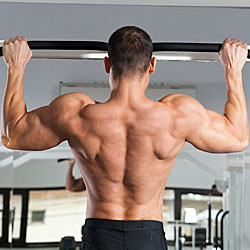
Tip 4: Mix Up Your Grip
Strict pull ups are performed with an overhand grip. End of story. Chin ups utilize an underhand grip which allows a lot more bicep action, and tend to be a lot easier. So if you are going to brag about how many pull ups you can do, count your strict reps, not your chin up reps.
That being said, chin ups and neutral grip pull ups are still great for developing your vertical pulling strength and these types of pulling skills do transfer over to strict pull ups. I recommend doing multiple sets of pull ups using different grips. It works best to start your session with strict pull ups, though, because they are the most taxing.
On days that I’m going to train multiple sets of pull ups, I like to do at least a few sets of strict pull ups to failure, and then move on to a few sets of neutral grip pull ups and/or chin ups depending on my mood. Any given day, though, you’ll find me grabbing onto things (rails, tree branches, playground equipment) and doing a couple pull ups using whatever grip the object demands.
Versatility in your pulling skills is a good thing; it all adds up to better functional strength. And if your main goal is functional strength, mixing grips is essential; it’s very rare in your daily life or chosen sport that you will be called upon to scale an object using only overhand grip strict pull ups.
You should also mix up the width of your grip to give yourself some additional variety. Do overhand wide grip, medium grip and narrow grip. Your default grip for a strict pull up should be slightly wider than shoulder width but not super wide. Wide grip strict pull ups are the most difficult of all the variations, while shoulder-width grip chin ups tend to be the easiest for most people.
Getting Better at Pull-Ups…The Bottom Line: Just Do More Pull Ups
To improve muscular strength and stamina for any exercise or movement pattern, you must provide your body with progressive overload; that is, increased challenge over time. You need to do pull ups frequently and once you reach a baseline of strength, say one to three perfect pull ups, you can employ a couple of easy strategies for sneaking more pull ups into your day rather than just doing them on days you’re specifically training your back.
The first strategy is called greasing the groove. Determine how many pull ups are fairly easy for you to complete without fatigue. That’s your groove. Random times throughout the day, grease the groove by performing just that many pull ups, no more, no less. Another strategy is paying the toll. Install a portable pull up bar in a doorway in your house or office and every time you go through that doorway, you have to pay the toll to pass by performing at least one pull up. Using either or both of these tricks will add up to a lot more reps over time and will go a long way toward helping you get better at pull ups.
Enjoy your pull up progress and be sure to share any success stories or favorite pull up tips in the comments below!
How to Get Better at Push-Ups

The push-up remains to this day one of the very best upper body exercises in existence. Some people may shy away from push-ups, mistakenly thinking that since push-ups are simple and old-school, there must be something better out there with all the fancy gym equipment around these days.
It’s a mistake to overlook the classic push-up exercise. As a personal trainer who has studied many exercise modalities, I can tell you that the push up is a classic for a good reason, and should be a staple of your exercise routine.
Read this article to learn all about why the push-up is so great, as well as push-up muscle anatomy, exercise guidelines for push-ups, how to perform the perfect push-up step by step, how to modify the push up exercise for different fitness levels, and many variations of push-ups complete with videos.
What Makes The Push-Up So Great?
The push-up is a great exercise for so many reasons. Here are the top three reasons that I love push-ups, both for myself and for the clients I train:
- Push-ups are EFFECTIVE. The push-up is one of the very best ways to work out your chest, triceps, and core muscles. Push-ups make your muscles look better aesthetically, build functional strength, and improve core stability. Learn more about functional strength here and core stability here.
- Push-ups are CONVENIENT. Requiring no gym equipment, the push-up is an anytime, anywhere exercise. It’s accessible to everyone, whether or not you can afford a gym membership or home gym equipment.
- Push-ups CAN BE MODIFIED for many different purposes. There is a push-up exercise variation suitable for pretty much anyone. For example, you can learn how to do triangle push ups, clap pushups, wide-grip pushups, and many other variations on this classic exercise. They can be made easier for people needing to work up to regular push-ups, or they can be progressed in difficulty to provide more of a challenge to those who have mastered the basic exercise.
Bodyweight exercises such as the push-up are often overlooked because they have no marketing department trying to sell you equipment! I am a big fan of many bodyweight exercises, not just the push-up; read my article on the benefits of bodyweight training exercise (https://www.askthetrainer.com/benefits-of-bodyweight-training-exercises/) to learn why you should join me in loving bodyweight exercises, as well as several great bodyweight exercises to build into your workouts in addition to the push-up.
Push-Up Muscle Anatomy
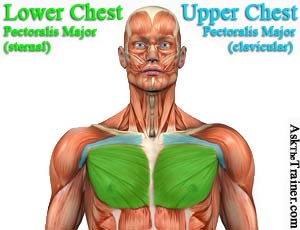 The primary muscles worked out during push-ups are your chest muscles, your shoulder muscles, your triceps, and your core.
The push-up is one of the best strength training exercises to target the main chest muscle: pectoralis major. A well-developed and functionally strong chest is a common goal for both male and female exercisers. Chest workouts are important to balance back workouts, ensuring muscle balance in the upper body. If I had to choose only one chest exercise to do for the rest of my life, I would choose push-ups over the bench press, pec flys, or any other chest workout out there due to the many unique benefits offered by the push-up.
Your shoulder muscles also get a great workout during push-ups, especially the anterior deltoids, which often synergize with pectoralis major during pushing movements.
Triceps, the muscle making up the back of the arm and balancing the biceps, also get blasted by push-ups. Adding push-ups to your routine can help balance out the bicep work many of us choose to focus on.
The core muscles are often overlooked in discussions of the push-up exercise, but push-ups require a lot of engagement from the core to properly stabilize the body. Thus, push-ups help build functional strength and stability in the core, which helps prevent injury and leads to better quality of movement during exercise and daily life. The core is not just the abs, but also the deep abdominal muscles, the lower back, the hip stabilizers…even the shoulder girdle can be considered part of the core. All of these get a great workout during push-ups.
Exercise Guidelines for the Perfect Push-Up Exercise
The most important aspect of performing push-ups is not how many set and reps (https://www.askthetrainer.com/sets-and-reps/) you can do; it’s your form. I would be more proud of a client who performed ten perfect push-ups and then collapsed in exhaustion than a client who performed a hundred crappy push-ups. Proper form ensures that you are getting the most out of the exercise in terms of strength training benefits while preventing injury or exacerbation of posture issues. Click here to learn more about posture problems.
Essential aspects of perfect push-up form include:
- ALIGNMENT: A straight “racing stripe” should be able to be drawn down the side of the body, hitting all the important checkpoints. Ear, shoulder, hip, knee, and ankle should all be aligned.
- CORE STABILIZATION: The core must be kept tight and stable. If the core sags toward the ground or the butt is sticking up in the air, you need to engage your core muscles. Either of these problems will be immediately apparent if you do an alignment check, looking for that “racing stripe”.
- SHOULDERS BACK AND DOWN: The shoulder blades must be pinched together and downward to stabilize the shoulder joints and prevent injury. Don’t let the upper back round or the shoulders hunch up toward the ears. Keep the shoulders back and down as if you were trying to tuck your shoulders into your back pockets. This is referred to as “scapular retraction”, and is a key element of proper form during exercise.
As far as tempo goes, when it comes to muscle development, time under tension is more important than speed. Go at a speed that allows you to focus on all aspects of perfect push-up form and you will get all the benefits push-ups have to offer.
As with any strength training exercise, it’s best to allow 48 hours between chest workouts using exercises like push-ups to allow your muscles time to rest, recover, and rebuild.
If you’re strength training your upper body, you need to stretch during both your warm up and cool down process. Read our article on upper body stretches (https://www.askthetrainer.com/upper-body-stretches/) to find out flexibility exercises for your chest, shoulders, and other upper body muscles.
Got all that? Good. You’re ready to do a perfect push-up!
How to Perform the Perfect Push-Up Step by Step
1) To begin the movement, lay flat on your belly on the floor. Always start your push-ups from flat on the floor to better build your functional strength.
2) Remembering all the points mentioned above regarding push-up form, push yourself up off the floor, pushing through the heel of your palm to generate greater force.
3) As you push upward, avoid locking your elbows into hyperextension; just straighten your arms without snapping the joint.
4) At the top of the movement, you are in what’s referred to as “plank position”, because your body should be as straight as a plank if you’re paying attention to your core stabilization and alignment.
5) Lower down until your chest is close to the ground without actually touching it, never sacrificing that plank-like alignment in an attempt to make it seem like you’re getting closer to the floor than you actually are. Prepare to push back up.
Congratulations! You have just completed one rep of the perfect push-up. Just do fifty more and then you’re done! Just kidding; again, simply focus on form, doing perfect push-ups until your muscles are fatigued. If you keep it up, your functional strength will improve with time and you’ll be able to do higher reps with ease.
How to Modify the Push-Up for Different Fitness Levels
The push-up exercise is simple to regress (make easier) as well as progress (make more challenging). The number one rule of progressing exercises is to make sure have mastered the basic movement before trying anything “cute”.
In this case, you need to be able to easily perform several reps of the perfect push-up described above before doing any of the following progressions. If you can’t do perfect push-ups yet, consider the following regressions to help build your strength toward being able to do push-ups and push-up progressions.
Regressing the Push-Up
Whether you’re a girl or a guy, avoid the “girlie” push-up at all costs. “Girlie” or “knee” push-ups build bad form habits, failing to engage your core muscles. If regular push-ups are too hard, regress the push-up exercise by raising the angle of your upper body onto a stable surface and performing the exact exercise described above.
Vertical push-ups standing with your hands against the wall are the easiest push-up variation. Once you’re good with that, trying doing push-ups against a countertop, then other low stable surfaces until you can do regular push-ups with your hands on the floor. You will likely need to stick with the regressed push-up for a few weeks before you notice significant gains in strength.
You can also perform regressed push-ups later on in a chest workout when you want to totally burn out your chest, but are too fatigued to do regular push-ups.
Check out this exercise video demonstrating how to use a weight bench to raise the angle of your upper body during push-ups.
Progressing the Push-Up
One simple way to progress the push-up is to do the opposite of what we do to regress it: instead of raising the angle of the upper body, raise the angle of the lower body by placing the feet on an elevated surface, such as a weigh bench or stability ball. This puts the upper body muscles under more tension, especially the shoulders, and also demands more from your core stability system.
Another way to progress push-ups is by adding controlled instability: try putting your hands or feet on a stability ball, your hands on either side of a BOSU Ball, or your feet in a TRX Suspension trainer. Click here to watch videos and learn more about BOSU Ball exercises.
If you’re super-crazy-strong, try a handstand push-up. The handstand push-up dramatically increases the demand on your shoulder muscles. However, keep in mind that if you want to work your chest, push-ups with feet elevated will place more emphasis on your shoulders instead of the chest, so they’re not necessarily the best chest exercise (https://www.askthetrainer.com/best-chest-exercises/).
The following push-up exercise videos can also be considered push-up progressions. As such, it’s important to remember that you should never try progressions until you can safely and easily execute the basic movement (in this case, the perfect push-up described and shown in the section above).
Push-Up Variations Exercise Videos
Push-up variations make the standard push-up movement more challenging. Some demand more from the same muscles we talked about above, while others involve entirely new muscle groups. I could go on and on about variations on the push-up exercise, but instead, I have chosen three of my favorite push-up variations to highlight.
Plyometric Push-Ups
Just like Rocky does! Plyometric exercises are the best way to gain explosive muscle power.
Plyometric push-ups are great for building explosive power in the upper body.
They’re basically an extremely forceful push-up with a clap.
Watch the video on the right to see how to properly perform a plyometric push-up.
Side Rotation Push-Ups
The side rotation push-up increases the core work element of push-ups, asking that you perform a standard push up, rotate into a side plank, perform another push-up, and then rotate into a side plank on the other side.
When you transition into the side plank phase, be sure to keep your core stable, never letting your hips sag toward the ground.
Watch the video on the right to see how to properly perform side rotation push-ups.
Spiderman Push-Ups
So named because you look like Spiderman climbing a building when you do them (except for the Spidey-suit and the fact that you’ll be on the ground, of course).
During a Spiderman push-up, you’ll lift one leg off the ground, bringing the knee laterally toward the armpit. This requires more strength as well as more flexibility than your standard push-up.
Watch the video on the right to see how to properly perform a spiderman push-up.
Final Thoughts
You can find lots of other push-up exercise videos on our chest exercise page here! While you’re at it, explore our Youtube Channel to discover exercises for every body part.
I hope this article has deepened your knowledge of the push-up and given you a newfound respect for this seemingly humble exercise.
Another fabulous simple bodyweight exercise you have to know about is the Lunge. This lower body exercise is one of the best ways to build your glutes, hamstrings, quads and calves. Read our article showcasing the lunge exercise to learn all about lunge anatomy, lunge form, and lunge exercise variations including videos.
Conclusion
Mastering pull-ups and push-ups and getting the most out of these fantastic upper body exercises takes practice and perseverance.
If you want to improve your chances of executing these moves successfully and dramatically improve your game, the tips we’ve covered here should have you working out like a champion before you know it.
Take your time, learn proper form and technique, and practice. You will persevere!
About Michael Behnken
Mike Behnken is a personal trainer who holds multiple NASM certifications and a MS in Exercise Science. Mike loves fitness, travel, and photography among many other interests.