- Like
- SHARE
- Digg
- Del
- Tumblr
- VKontakte
- Flattr
- Buffer
- Love This
- Save
- Odnoklassniki
- Meneame
- Blogger
- Amazon
- Yahoo Mail
- Gmail
- AOL
- Newsvine
- HackerNews
- Evernote
- MySpace
- Mail.ru
- Viadeo
- Line
- Comments
- Yummly
- SMS
- Viber
- Telegram
- JOIN
- Skype
- Facebook Messenger
- Kakao
- LiveJournal
- Yammer
- Edgar
- Fintel
- Mix
- Instapaper
- Copy Link
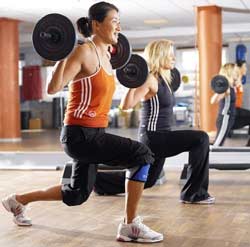
Introduction
Some of the most common lower body exercises also happen to be some of the most effective exercises when it comes to building muscle and raw strength. We’re talking deadlifts, squats, and lunges!
If you’re ready to take your lower body game (and muscles) to new levels, mastering and consistently utilizing these ultimate lower body exercises is a must.
Out of all the questions we receive here at AskTheTrainer.com, how to get better at a particular exercise sits high on the list. This detailed how-to guide is for all of you.
Enjoy!
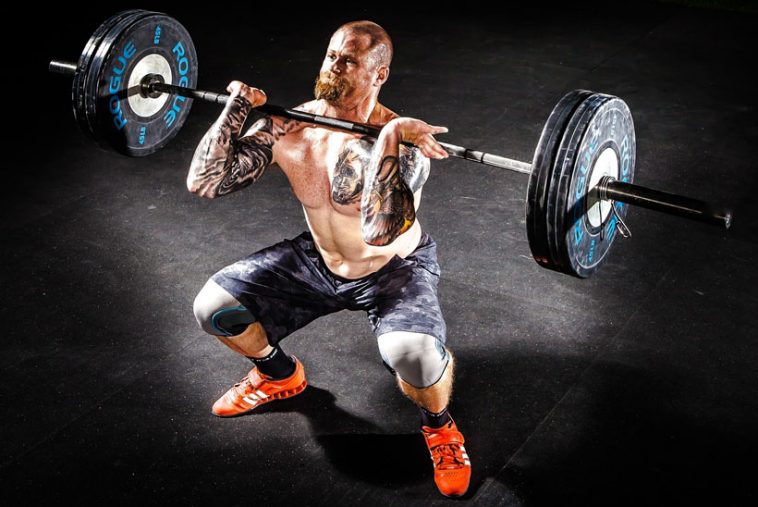
How to Get Better at Deadlifts
Performed well, deadlifts will pack on mean slabs of muscle in all the right places, pick up your sorry posture which is likely utterly ruined from the pitfalls of modern living, and give you something even cooler than your bench press weight to brag about. Performed poorly, deadlifts will strain your hammies, herniate your intervertebral discs, and at best just make you look like a total noob.
I love deadlifting and I love training women and men of all ages to perfect this lift. It transfers extremely well to both athletic pursuits as well as to safely lifting just about anything you’ll encounter in day to day life. Though we could certainly devote ten times this much space to discussing the deadlift, let’s go over a few of my favorite tips for getting better at deadlifts.
5 Simple Tips to Improve Your Deadlift
Tip #1: Understand Deadlift Form
Pointing out that you need to understand deadlift form to get better at the deadlift may sound like a total no-brainer. But as a trainer, I see so many wack deadlifts in the gym that the point bears belaboring.
Though I could pick the issue apart from quite a few different angles, the main point I’m going to choose to harp on is this: lift with your legs, NOT with your back. If your back is rounding, it doesn’t matter how much weight is on the bar. You are not being badass and strong. You are at a high risk of injury and you need to stop and correct your form! Your spine should be flat (well, mostly flat with your natural lumbar curve intact) and your core should be tight throughout the movement. The only bending is in the hips, and to a lesser degree, the knees. Remind yourself a million times until it happens naturally: hinge at the hips!
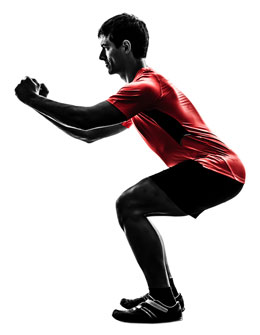
Tip #2: Don’t Squat Your Deadlift
You need to not only understand it in your mind, you need to truly teach your body the difference between deadlifting and squatting. These are two fundamentally different movements with different purposes that utilize different muscles in different ways, and are just, well…different! Listen…both movements are essential, and to get the most muscle stimulus out of them and lift the most weight in the most efficient way, you need to make sure you’re doing them correctly and not confusing the dynamics of one with the other.
A squat is a pushing movement, while a deadlift is a pulling movement. During a typical squat, the resistance is already in place at around shoulder level or chest level. You use your legs, glutes, and core to lower your body plus the resistance in a controlled fashion, then you PUSH the ground away, fighting against gravity to stand back up. During a deadlift, on the other hand, your goal is to grip and pull a weight that is just laying there dead on the ground up to hip level in a full standing position.
The main muscles used in a deadlift are your glutes, hammies, and back. Really, the entire posterior chain (the muscles all along the entire back of your body) are involved in a deadlift. I see a lot of people in the gym squat down with their chest up, their knees coming forward, and their butt down low to attempt to deadlift. Not only is it awkward and inefficient, you stand a higher chance of hurting yourself if you are squatting a deadlift.
Instead, you need to lift your hips, flatten your back, and keep your knees DIRECTLY over your ankles so the bar can travel a perfectly straight line upward as you deadlift.
If you’re squatting down with knees creeping forward toward your toes, you will be forced to sway the bar forward to get it past your shins and knees. So get ready to lose pounds and pounds off your deadlift weight and skin the bejesus out of your shins if you squat your deadlifts.
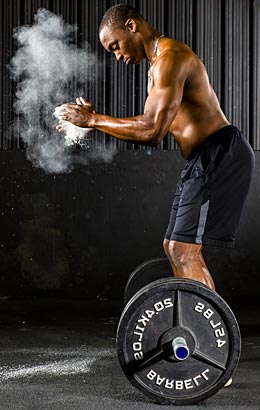
Tip #3: Get Your Grip Dialed In
Grip strength is often the limiting factor in your deadlift. That is, your lower body and back muscles may be perfectly capable of pulling more weight, but either your grip technique is bad or your grip strength itself is lagging behind, so your forearms and fingers get torched during your set and you have to set the weight down, frustrated again.
There are a few key strategies for improving your grip. The first is to simply choose a grip that works well for you. The three types of grips you can use are standard overhand grip, mixed grip, and hook grip. Each grip presents its own set of challenges and rewards.
Standard overhand grip is the most simple, but it’s the least stable when you are pulling heavy weight. If you can’t get a good strong grip on the bar, it can roll right out of your hands or you may not be able to get it off the ground at all.
A workaround for the overhand grip issue is to use a mixed grip: one palm up and one palm down. This sandwiches the bar from both angles and minimizes slippage. However, most lifters get into a groove where they always have the same hand up and the same hand down, and this can create muscle imbalances as well as traumatize the palm-up side’s shoulder joint and biceps tendon. If you do a mixed grip, make sure to train evenly by switching back and forth on which palm is up or down on each set.
A third option, favored by Olympic lifters for pulling truly staggering weight, is the hook grip. The hook grip is more secure than the overhand grip and does not create muscle imbalances or trouble the shoulders like the mixed grip, so many consider hook grip to offer the best of both worlds. To do a hook grip, just place your thumb underneath your fingers as you grip down on the bar and hold on for dear life. Some may complain that this is rather uncomfortable for the thumb at first…but as with many things, you can toughen up to it and reap greater rewards down the road.
Another quick tip for the grip is to use chalk to cut down on slippage from sweaty hands. However, since chalk improves the grip so much, you won’t ever develop a great grip if you ALWAYS use chalk. So I recommend doing your initial sets without chalk to help work your grip muscles harder and only chalking up when you have broken a good sweat.
Tip #4: Do Complementary Exercises
You’ll need to shore up weak links in your kinetic chain in order to truly own the deadlift. Deadlifting requires strong lats, back extensors, glutes, hamstrings, quads, shoulders, forearms, and hands! Exercises that address these individual areas, especially those in which you know yourself to be weak, can work wonders.
Though this list is not exhaustive, here are a few of my favorite complementary exercises that will help you nail all the ins and outs of the deadlift.
- Barbell Hip Thrusts for glutes and hamstrings
- Back and Front Squats for quads, hams, and glutes
- Supine Row and Pull Ups for lats, grip, and core
- Farmer’s Carry for grip and core
On a similar note, you need to make sure you have proper flexibility in your muscles and connective tissues to deadlift correctly. Common areas of tightness that become stumbling blocks are the hamstrings and hips. You’ll know your hammies are glued down if you try to hip hinge to grab the bar and you can’t get down there without rounding your back or “tucking your tail”. Wail on your hamstrings with the foam roller and stretch them for at least 60 seconds day after day and you will see improvements in this notoriously stubborn muscle group.
Tip #5: Check Your Ego at The Door
It’s true that in order to improve, your muscles and nervous system require progressive overload, or increased challenge over time. However, there is a line in the sand between pushing yourself enough and pushing yourself too hard.
Here are a list of common no-no’s among folks who are overdoing it with their deadlift strategy. Falling victim to any of these pitfalls will cause you to leave real progress on the table as well as put you at risk for injuries to your back, shoulders, and hips. Overtraining heavy deadlifts introduces these risks even if your technique for the movement itself is flawless.
Do not deadlift too much. Deadlift a maximum of three days per week, and only one really heavy low rep day per week is best. Do not try to add weight every single session. It may seem counterintuitive, but when you are just getting started, you may notice that you are making quick and steady progress with each and every session, but the more experienced you get, your gains slow down markedly. This is because in the initial phases of training, your nervous system is becoming more efficient at recruiting muscle fibers that are already there. As you progress, your nervous system has undergone a ton of adaptation while your raw muscle mass takes over the forward progress. Muscle growth tends to occur much more slowly than nervous system adaptation. Finally, don’t deadlift when you are fatigued. This is a very demanding lift that requires freshness and focus to accomplish correctly. I generally recommend deadlifting at the very beginning of your workout so you are able to devote the energy and attention this lift really needs.
12 More Awesome Ways To Improve Your Deadlift
You can bounce the bar off your chest and kid yourself that your bench press rep counted.
You can squat to questionable depth and fool yourself that it was a solid rep.
But when it comes to the deadlift, you’re either strong enough to rip the bar off the floor…or you’re not.
It’s a true test of raw strength and power that’s as black and white as it comes – you either make the lift, or you don’t.
If you want to improve your chances of executing that monster lift, there are a number of ways you can streamline your technique to maximize your performance at the bar.
Here are 12 ways to improve your deadlift technique from the trainers at Ultimate Performance Los Angeles…
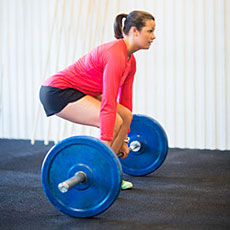
#1. Centre the bar
Setting up is vital when it comes to the deadlift – the bar needs to start in the middle of the foot.
To land a deadlift PB, you need to keep the bar as close to the body as possible during the lift and ensure the bar travels the shortest distance possible
What we mean by this is that any slight deviation the bar makes from this ‘centre line’ will result in less overall weight lifted.
Sticking to this centre line means the bar should start through the centre of the foot when you’re setting up.
A common mistake to avoid is putting the bar in the middle of the forefoot, rather than the middle of the whole foot.
You want the bar to bisect the arches of the foot. With the right set up, your shins will be just a few inches away from the bar before you bend and grip it.
#2. Enhance your grip
A strong grip begets a strong deadlift. You will find that without a strong grip, your nervous system won’t recruit the maximum amount of muscle mass.
Your brain understands that if you can’t firmly hold onto a weight with your grip, then there’s no way you should be trying to lift it off the floor.
So, if you don’t have a vice-like grip locked onto the bar, it’s going to be nigh on impossible to lift.
A simple way to test if your grip strength is holding you back on the deadlift is by using straps.
Try lifting a weight you’ve hit failure on while using straps; if you can lift it with relative ease, you know it was your grip rather than your overall strength that was the weak link in the chain.
Once this is singled out, you can work on building it up and thus improving your deadlift.
#3. Squat big
Build a bigger squat and you will likely improve your deadlifting prowess.
Focusing on forging a big squat will help you hit bigger numbers in the other major lifts too.
This is because squatting requires so much strength and stability through every major joint that it carries over into your performance on other big lifts.
It will help strengthen everywhere from your upper and lower back to your glutes and hamstrings.
Building that big squat means developing solidity and stability through your entire body and this supreme strength translates over to the deadlifting plaftform.
Stick 20kg onto your squat, and your deadlift will likely improve without even deadlifting a single bar.
#4. Pin the bar to you
Getting that PB-busting deadlift means keeping the bar as close to you as possible.
What this means is keeping the bar in constant contact with your shins and legs on the way up.
Yes, shin scraps may happen if you’re keeping the bar close enough – but it’s a price you’ll pay for hitting numbers you’ve never hit before.
Even if the bar errs slightly forward of the body and leave contact with the legs, this can place considerable forces on the lower back – this is something you not only want to avoid to prevent injury, but also to stop you failing on the lift when approaching maximal weights.
#5. Employ chains training
When you look at the movement, a deadlift’s hardest point should be when the weight is just leaving the floor and it should get easier towards the top.
With this in mind, attaching chains to the bar can help bust plateaus.
Why? Sticking short chains onto the bar will mean it’s lighter at the start of the movement (where it’s most difficult) as the chains’ weight rests on the floor.
But this weight gets increasingly heavier as the bar comes off the floor and the chains lift off with it.
The technical term for this is ‘accommodating resistance’.
#6. Deadlift less frequently
When you squat more, you often benefit from the increase in frequency. The same isn’t true for the deadlift, however.
Discovering the right frequency is important to progress faster on the big lifts like the deadlift – but everyone is different, so test it for yourself.
Some people progress bests with as few as five days between deadlifting sessions, while others may fare better with 10 day gaps between deadlifts.
Overall, though, you’ll be deadlifting less frequently that the other big lifts.
One way to test what works best for you is to try leaving 4-5 days between workouts, then when you subsequently lift, note how fresh you feel and how well you’re moving the weight.
Has the weight increased? Do you feel stronger? Has the speed of the bar increased?
If the answer is ‘no’, try leaving it 6-7 days next time and measure your performance again.
To assess, try leaving four or five days between workouts and next time you lift, pay attention to how fresh you feel and how well the weight is moving. Have you increased weight? Do you feel stronger with tighter form? Is the bar going up faster? If not, leave it six days next time and repeat as needed.
When you’ve had the right degree of recovery between sessions, you’ll feel a noticeable difference and the weights will often fly up far easier.
#7. Get low to the ground
Remove your running shoes; go bare foot. You can add a significant amount of weight to your deadlift just by removing your soft-soled shoes.
Firstly, there’s less distance to move the weight as you’re closer to the ground – some training shoes can add several centimetres of extra distance that you have to pull the weight over.
When you’re dealing with maximal weights, this can make a big difference.
Secondly, these training shows absorb some of the force you’re driving the lift up with (they’re designed to be soft to absorb force while running).
Thirdly, it comes down to stability. You can easily lose balance in a soft-soled shoes if your weight shifts during the lift and an area of the shoe collapses.
Having a stable base means greater potential to lift more.
Just look at some of the best deadlifters on the planet – you’ll see them lifting barefoot or with trainers with low, flat soles.
#8. Don’t ‘squat’ your deadlift
One common mistake many beginner lifters make is squatting the deadlift.
Senior PT Chris Gregor from UP London believes:
“It probably comes from knowing that you should ‘keep your back straight’ while being instructed to ‘lift with your legs’.
What happens as they try to stay as upright as possible is they squat down to the bar; the bend comes from the knees rather than the hips.”
But it’s important to remember, the more your knees bend, the further from the bar must then travel to get around the kneecaps.
This often results in the bar coming away from that golden centre line and this adding stress to the lower back.
Don’t bend the knees as much, keep the hips back and this will put less stress on the back.
#9. Pause on the floor
If you’re going for reps on the deadlift, it can be so tempting to use the slight bounce to make the rep easier with momentum.
But actually you’ll get greater benefit from putting the weight down, pausing, then resetting your body position.
When you bounce reps off the floor, you rob yourself of the maximum stimulus.
Controlled, paused reps that momentarily stop on the floor helps eliminate weakness at the portion of the lift from the ground.
It also means you can work on improving your set up and getting the requisite tightness throughout your body.
Working on overcoming the inertia of moving the stationary bar is something that can only benefit your strength and deadlifting ability.
#10. Do more sub-maximal reps
To improve your deadlifting, you need to drill the technique. If you’re not practicing, you’re not improving.
As the saying goes, practice doesn’t make perfect – perfect practice makes perfect.
You’re not going to be able to garner perfect technique performing ultra heavy reps all the time.
That’s where sub-maximal reps come in. Just because you’re not going for a one-rep max every week, doesn’t mean you’re not going to be able to build strength.
Any lift above 70% of your one-rep max will likely improve your strength. So if your 1RM is 140kg, you can perform reps with 98kg and still get stronger while honing your deadlift technique.
Lifting at 70% normally means you can work at higher rep ranges. But with the deadlift, you often fatigue quicker, even though the weights are lighter.
So you’re actually better off going for lower reps with the lighter weight, stopping well before technique breakdown and failure.
Reduce your rest between sets. You can perform, for example, six sets of three reps around 70-80% of your one-rep max with just 60 seconds between sets.
#11. Film your lift
It’s easy to spot someone in your gym lifting with terrible form. Everyone has cringed at someone wrestling a barbell up with absolutely no technique.
But when it comes to your own form, is it perfect? It can be hard to tell unless you measure and observe it from the outside.
If you want to change something, you must first measure it. You always track the weights, sets and reps you have lifted at the gym – but do we track and record what those reps actually looked like?
Improving your deadlift is just down to how much weight you move, but also how you move that weight. Making your lifting technique better will allow you to lift more weight and help you progress safely.
Filming your lifts is a useful way of tracking your progress and how objectively assessing your technique.
It was highlight areas you need to improve far better than just going off how a lift feels.
It’s always best to film at an angle perpendicular to the lift. Having the camera at a 45-degree angle, or positioning it too high or low, makes it tough to properly assess your lift.
#12. Hold your breath
When deadlifting, you need a considerable amount of intra-abdominal pressure and stability.
As you’re about to lift, you should take a deep breath like you’re trying to fill your stomach with air.
Next you need to lock the abdominal muscles tight against this air. What this does is serve to increase trunk pressure and keep you tighter during the lift.
Don’t exhale until you’ve completely locked the shoulders back at the top of the movement.
To understand the importance of breathing, have a go at the following:
Breathe out forcefully until you’ve emptied your lungs. It’s likely that your shoulders collapsed forward, right?
Well, the opposite happens when you breath air in – your shoulders naturally pull back, your chest expands and your head comes up.
This is the exact posture we’re looking for when deadlifting. So, before you lift, breathe in, expand your chest and hold it.
How to Get Better at Deadlifts: The Bottom Line
Few, if any, lifts give you as much back as the deadlift. In terms of improving the aesthetics of your body as well as the sheer strength of your muscles, and even for correcting the ubiquitous posture problems caused by modern living, deadlifts are a girl’s and a guy’s best friend. I can think of few, if any, better uses of your time and energy than mastering this essential lift.
See Also:
How to Get Better at Squats
Looking for some help getting your squat game off the ground? Look no further: I have five tips to help beginning and intermediate squatters get this absolutely essential lift dialed in. The squat is great, of course, for building muscle in the quads, hamstrings, and glutes. It’s also awesome for burning calories and altering body composition by contributing to fat loss. Additionally, it’s a key exercise for improving athletic performance in terms of strength, power, and range of motion.
So are you squatting yet? If anything is holding you back from starting squats or improving your squats, you need to attack your weak points with intensity so you can reap the great rewards this lift offers when performed correctly. While most of these tips apply to any type of squatting exercise, I have barbell back squats and barbell front squats first and foremost in my mind because they tend to be best once you reach a certain level of squat competence.
Top 5 Tips to Improve Your Squat
Squats Tip #1: Understand Squat Form
There are many different types of squats that all give you slightly different benefits. As I have said, I myself am a big fan of the barbell back squat and barbell front squat, as well as a good old fashioned bodyweight squat or kettlebell goblet squat for beginning squatters or as warmups for more advanced lifters.
Let’s go over the quick and dirty details of squat form that apply to pretty much any type of squat. At the most basic level, to squat, you must sit back into an imaginary chair. The operative phrase is to “sit back”. If you don’t sit back through your hips, you will have to bring your knees forward and rise onto tippy toes. This is called crouching, not squatting. Crouching is okay with the spine unloaded (i.e., body weight) as you go about your daily activities, but if you are adding resistance with a barbell, dumbbells, or even just a heavy backpack, squatting is healthier for your hips, knees, and back.
As you sink your hips back and down into your imaginary chair, keep your chest up rather than letting your chest sink forward. Keeping your lats and your core engaged will go a long way toward maintaining that upright posture. A back-loaded squat allows for a bit more forward lean, while a front-loaded squat requires you to keep your torso quite upright. Front squats also necessitate a bit more mobility both in the hips and throughout the spine. Both skills are worth developing.
You’ll hear a lot of noise out there on appropriate squat depth, but general guidelines are that for a squat to really “count”, you want to get the crease of your hips below the tops of your knees when viewed from the side. If you are a beginner, focus on getting the flexibility and confidence to make this happen before you start loading up with a lot of extra weight. Squatting above parallel will not do much for you unless, for example, you have an injury or joint replacement that you are rehabilitating, so if you are healthy, devote yourself to mastering full range of motion.
My final point on form for our purposes here: the idea that squatting is bad for your knees is a myth. Our bodies are meant to squat, and if you have a fairly healthy kinetic chain, you can and should squat. Squats are only bad for your knees if you do them wrong, for example, if you crouch down with knees coming forward beyond the toes, or if you allow your knees to cave inward. Viewed from the front or back, you must keep your knees either parallel or shoved slightly outward, and viewed from the side, they must not travel forward beyond the toes, though they can absolutely travel forward relative to the ankle, especially when executing a front squat.
Squats Tip # 2: Be Consistent, Regressing and Progressing Appropriately
Including squat sessions at least twice each week is generally required to make progress, and three times weekly may work better for you depending on how heavy you are squatting at any given time. Less heavy sessions generally necessitate higher frequency to stimulate enough progress. You will recover faster from lighter sessions than if you squat heavy meaning that you can afford to squat more often.
On the other hand, if you are really pushing yourself for several sets of low reps (between one and five), twice weekly may fit the bill. Many people report good progress cycling between a couple light days and one heavy day per week, or vice versa. This strategy has worked for me personally as well.
There are dozens of different squat programs you’ll find out there. Here are the general guidelines I would suggest for squat progression: If you are a beginner, just focus on stability and endurance: a few sets of higher reps (12-15) at a manageable weight for at least the first month. This can be just bodyweight, or adding small amounts of weight such as a kettlebell held to your chest or an empty olympic bar held in the back squat position.
As that becomes easier and you get hungry for more, switch up your training into strength mode by adding more weight and doing fewer reps (8-10) for three or four sets. Once you’ve mastered that approach for about a month, you have options on branching out into other ways of training squats. If you want to add muscle mass and strength, adding more weight and dropping reps even further (around 5) can work great once you have established a couple months of both stability and strength-style squatting. Most folks will do best cycling through different training styles every month or two to keep progressing.
Squats Tip # 3: Sink the Bar Like a Plumb Line
You know how a plumb line has no choice but to sink straight down and rise straight back up? Picture the path of the bar as plumb line. The straighter the line, the more efficient the lift and the more weight you will be able to lift safely.
This means you need to use your body to control the bar rather than letting it control you. If you don’t engage all the necessary muscles to keep the bar travelling in a straight line, it can either fall forward or backward, and neither is a good scene for you.
Engaging the core by bracing your abs, locking down the lats by keeping your elbows pulling in and down toward the ribcage, and engaging your hip external rotators by “shoving the floor apart” will all contribute to your ability to keep the bar on stable straight line path.
Squats Tip #4: Focus on Foam Rolling to Improve Flexibility
If you are struggling to get adequate depth in your squats, or if they just feel really awkward overall, flexibility issues are likely at play. Our culture of constant sitting engenders, among other things, excessively tight hips, hamstrings, and calves.
If you feel like you are going to tip over when you approach or clear parallel in your squats, and especially if your butt is tucking under (cutely referred to as “butt wink), this means your hamstrings are glued down way too tight. If your feet point out like a duck as you squat down, your calves are likely quite rigid. Many, many people have these problems that limit their ability to really get the most out of squatting…and to remain injury-free.
The first step to the solution is to hit the foam roller. Practice self-myofascial release of the hamstrings, calves, hip flexors, and quads as if your life depends on it. Roll each muscle for at least 30 seconds each, focusing on each part of each muscle group, hunting all over for tight and tender spots and rolling them mercilessly. Recognize the the quads have four parts each, the hamstrings have three parts, and the calves have three parts. You will likely find tender spots all up and down the different parts of each muscle.
Squats Tip #5: Follow Up Foam Rolling With Stretching
Directly after spending 30 seconds rolling each of these tight areas, stretch the hamstrings and calves for a minimum of 30 seconds each. These are notoriously stubborn muscle groups, but rolling and stretching will ease each of them to their proper extensibility over time. You’ll also want to stretch your hip flexors and quads.
Dropping into a deep primitive squat position and holding for at least 60 seconds at least once a day will go a long way toward both aiding your flexibility and helping you feel more comfortable in a deep squat position. Grab onto something stable, such as a tree, pole, or heavy table leg and focus on lifting your tailbone, lifting your spine into a neutral position which maintains your normal lumbar curve, and keeping your chest from caving in. Deep tissue massage, although painful, can also prove extremely helpful for unlocking tight tissues.
In addition to the hams and calves, there are definitely other muscle groups which, if tight, will really mess with your squats. If you are unsure about your personal areas of restriction, a certified personal trainer or a physical therapist can perform an assessment to identify where you could use some work.
Flexibility issues are not fixed overnight; as with many aspects of fitness, consistency is the key to improvement.
How to Get Better at Squats: The Bottom Line
Prioritize this awesome lift and it will pay you back in spades. There are few if any exercises better for building strength, muscle mass, mental toughness, and overall athleticism. Be sure to progress at an appropriate rate, remaining patient with yourself as your flexibility, muscle strength, and neurological coordination all adapt and you become able to execute this essential lift smoothly and safely.
How to Get Better at Lunges
There are No Absolutes in the World of Health and Fitness, But…
The lunge exercise is one of the very best exercises for your legs and butt. You can perform this versatile exercise just about anywhere, and you can do so with or without weights.
Lunges are also one of the best functional exercises. Functional exercises are exercises which work your body in multiple planes of motion, just like activities of daily living and athletic events.
Lunges are multi-joint movements which strengthen the muscles or your lower body while improving your stabilization and balance. Lunges are very safe and effective for almost everybody and require little or no equipment to get a great workout.
There are so many reasons to perform the lunge exercise. Lunges should be one of the staple exercises in your fitness program regardless of your goals.
Here You Will Find How to Properly Perform Lunges and How to Modify Them to Create a Time-Efficient Full-Body Workout
Jump to the Lunge Exercise Videos or continue reading to learn more.
How Do You Perform Lunges Safely and Properly?

If you read about the best leg exercises, you will already know that the knee is actually made up of three separate joints.
Instead of going through the anatomy and physiology of the joints, cartilage, ligaments, tendons, muscles and bones of the knee joint, you can look at common knee injuries to help you understand how to perform lunges properly to avoid injury.
Tibiofemoral Joint Injuries Seldom Occur in the Gym Setting
You may have heard about knee injuries such as torn ACL or MCL ligaments and damage to the meniscus, which is the cartilage of the knee.
These injuries are associated with the tibiofemoral joint, which is the articulation between your femur and the tibia (shin bone).
The tibiofemoral joint is supported by 4 ligaments and cartilage which provide joint stability. Tearing a ligament in the knee usually involves an acute trauma, such as getting tackled.
Patellofemoral Overuse Injuries Are the Most Common Knee Injuries for Non-Athletes
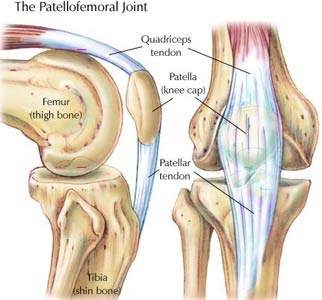
The patellofemoral joint is the articulation between your patella (knee cap) and the quadriceps tendon.
The patellofemoral joint assists the motion of leg extension and protects the knee joint. Unlike most movable joints in the body, the patella does not articulate with another bone.
Since the patella is moveable, muscle imbalances can cause the patella to move out of correct alignment. During repetitive motions such as running, walking, cycling, climbing stairs, weight training, and doing lunges, muscle imbalances can lead to the common overuse injuries affecting the patellofemoral joint.
You may have heard of different common overuse injuries to the knee called “runner’s knee” and “jumper’s knee”, which are part of patellofemoral pain syndrome.
Bad exercise form can exacerbate the development of these syndromes, and that is why maintaining proper form during the lunge exercise is so important.
Since the Lunge Exercise is a Multi-Joint Functional Exercise, it is Best Used as a Full Lower-Body Exercise
What this means is that when you perform lunges, you should use the form which will best benefit your entire lower body. If you use form which puts all your weight on your front foot, you will put most of the stress on the quadriceps.
While this way to perform lunges isolates the quadriceps, it puts excess stress on the patellofemoral joint, which can lead to the overuse injuries mentioned above. It is best to focus safer and more effective exercises for the quads if your goal is to isolate them.
To Perform the Lunge Exercise Most Effectively, Keep your Ankle Directly Below Your Mid-Knee
If you perform every variation of the lunge exercise while keeping your ankle directly below your mid-knee, you will not only work the majority of your lower body muscles evenly, you will avoid placing your knees under excessive stress.
When you perform any lunges, lunge forward and place your body weight on your front heel before weighting your toes at all. As you lower your torso toward the floor, concentrate your body weight on the back 2/3 of your foot and never your toes.
At the bottom of the movement, your back knee should be about 1 inch off of the floor with your back toe pointing straight ahead. Since the lunge exercise is a lower body exercise, you must keep your torso upright and your upper body in good posture.
Another Benefit of Proper Lunge Form is that You Stretch Your Hip Flexors, Which Allows You to Work Your Butt More Efficiently
Many Ways to Perform the Lunge Exercise
Before you try any intermediate or advanced lunges, be sure to master the correct form of the basic, beginner forms of the lunge exercise. Here are the most basic forms of the lunge exercise which involve only your lower body. You can perform them while holding dumbbells for added resistance, or just with your body weight.
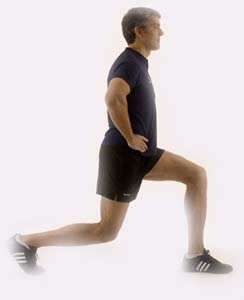
Beginner Lunge Exercise
Walking Lunges
Walking lunges are the most basic form of the lunge exercise. Walking lunges are great because they are a functional exercises which helps you increase functional strength.
Functional strength will help you live daily life more efficiently while improving your balance and coordination for athletics.
Start: Stand with your shoulders in neutral posture and draw in your core.
Begin the motion: Step forward, gliding your foot along the ground until your heel touches a few feet in front of you. As your front toe lands, bend your front and rear legs, lowering down until your rear knee is about 1 inch above the floor. Your front heel should be directly below your knee. Both legs should bent at around a 90 degree angle.
From the bottom position you have many options. For the basic lunge, lift your body up at the same time you bring your hips and rear foot forward until you are in the original standing position.
Push Back Lunges
Push back lunges are another great functional exercise. If performed properly, they can help you develop explosive power in your lower extremities, as well as tone and build your hamstrings, quadriceps and glutes.
Start: Make you are on a non-slick surface. Stand upright with your core tight and your shoulders in neutral posture.
If you have weights, you can either hold them hanging down at your sides or from a high-hang position at shoulder level.
Regardless of where you hold the weights, make sure they remain close as possible to your center of gravity, or the middle of your body.
Begin the motion: Lunge forward, gliding your foot along the ground, landing on your heel first before your toes.
Lower your torso straight down with little forward motion once your front heel hits. Your back knee should stop about 1 inch above the ground.
Pause here for a second, then explosively push yourself back to the original position and alternate legs. Do not allow the weights to swing or your upper body to lean forward or back for the duration of this lunge exercise.
Intermediate Lunge Exercise
Front Foot Elevated – Stationary Lunges / Split Squats
Elevated stationary lunges are also called split squats. They are a great multi-joint legs and butt exercise which can be effective with just your body weight.
Start: Put your front foot up onto an elevated surface. Position your knee so the middle of the knee joint is right on top of your ankle. Hold a pair of dumbbells in the low- or high-hang position.
Scoot your rear foot backward until you can create around a 90 degree angle with your back leg to match your front leg. The ball of your back foot should be on the floor. Draw in your core and keep your shoulders retracted.
Begin the motion: Slowly lower yourself straight down toward the floor. Your upper body should remain upright with a neutral back.
Do not let your knee move forward at all if you are trying to work your butt. When your back knee approaches the floor, pause for a second and lunge back up to the top position.
Modifications: You can increase the difficulty of these legs and butt exercises if you use an controlled unstable surface for your front foot. A BOSU ball would be a good choice.
Rear Foot Elevated – Stationary Lunges / Bulgarian Split Squats
Bulgarian split squats are another version of the lunge exercise. The elevation of your rear foot increases the challenge, as you’ll be balancing on your front foot.
Start: You can use a weight bench or any elevated stable surface. Put your rear foot up onto the surface. Whatever you choose to rest your rear foot on, make sure it allows your toes to point in the same direction as your knees.
Hop your front foot forward until the middle of your knee is directly above of your ankle. This requires pretty good balance. You can hold onto something if your balance is poor.
Begin the motion: Keep your upper body as upright as possible as you lower down toward the floor. Don’t allow any forward motion in the front thigh.
Modifications: If you decide to perform these legs and butt exercises while you hold on to something, you should use extra resistance. If you set up close to a squat rack you can position the bar to where you can hold on for balance. If you decide to hold on, you can hold a dumbbell in the same hand as the forward leg.
Lunges with a Twist
Lunges with a twist are an exercise which will allow you to gauge your progress. If you are able to properly perform lunges with twist, you are most likely ready to progress to the most difficult advanced lunges.
If you haven’t mastered the lunges with twist you should practice until you master them before you move on to the advanced lunges. The previous lunges have all been lower body only with no upper body movement. Lunges with a twist work your lower body as well as your core and obliques.
Start: You can either perform these walking provided you have enough free floor space or stationary if space is limited.
You can perform lunges with a twist with a weight such as a medicine ball or just with your outstretched hands. Stand up tall with your core drawn in and your shoulders in neutral alignment.
Begin the motion: Lunge one foot forward and land with your heel or the back 2/3 of your foot first. Lunge far enough forward that your knee is directly above your ankle and your front and back legs are both close to a 90 degree angle.
From the bottom position with your back knee about an inch off of the floor, extend your arms with the medicine ball. Keep your core tight and rotate your upper body and the medicine ball over the front leg as far as you can while you maintain your drawn in core.
Modifications: You can perform multiple stationary lunges for each lunge or multiple twists each time you lunge for a more intense workout. This is a good exercise to use at the beginning, middle, or end of your medicine ball workouts.
Advanced Lunge Exercise
Advanced lunges are all about adding multiple exercises and multi-joint motions to your lunges. This will allow you to work a very large amount of your body mass, which boosts your metabolism and burns more calories. This is great for maximizing your time in the gym, but requires mastery of the basic and intermediate versions of the lunge exercise.
Lunges with Lateral Raises
Lunges with lateral raises allow you to work your shoulders while you perform the best lower body exercise, which as you now know, is the lunge exercise.
Just a reminder: if you are trying to lose weight or tone up, it is best to use mostly multi-joint exercises in your workout plan while avoiding isolation exercises such as lateral raises. This is a great way to get in some lateral raises while you perform a lunge, which will work a large muscle group at the same time.
Start: Stand up with a pair of dumbbells held at your sides. Your upright upper body posture should remain constant for the duration of your lunges. Draw in your core as you take a deep breath.
Begin the motion: Lunge one foot forward, gliding it along a couple inches above the floor. Land on your heel and set your toes down while keeping the majority of your weight on your heel.
Lower your body toward the ground. As your back knee approaches the floor, pause with your torso upright in the middle of both legs which should be at congruent 90 degree angles. Perform a lateral raise and lower your arms as you lunge back up to the original position.
Modifications: You can also perform front raises separately or along with your lateral raises. You can perform multiple stationary lunges in between each step to increase the difficulty as well.
Lunges with Biceps Curls and Shoulder Press
Lunges with biceps curls and shoulder press are one of the most advanced forms of the lunge exercise.
In this lunge exercise, you will perform a full lower-body dynamic contraction with an isolation movement for your biceps, and then from a balanced position a multi-joint movement for your deltoids and triceps.
Start: Get focused and stand up tall with a pair of dumbbells at your side. Keep your core tight and your upper body should be upright for the duration of this entire complex movement.
Begin the motion: Lunge forward as usual putting your heel down first and making sure your upper body is in the center of gravity. Perform a biceps curl when your body is completely stable at the bottom of the lunge. After you perform your curl keep the dumbbells at shoulder level in a high-hang position.
Lunge back up to a balance and perform a shoulder press. Try to keep your balance and let the weights come all the way down to your sides at the original position and repeat.
Modifications: You can add a stationary lunge in between each step to make this exercise more difficult. You can also add a biceps curl during each stationary lunge and multiple shoulder presses during each balance. There are many different possibilities for modifying this advanced lunge exercise, limited only by your imagination. Just remember that safety and science should always come first. Once you have the basics mastered, feel free to improvise and develop your own workouts.
Conclusion
Mastering deadlifts, squats, and lunges and getting the most out of these awesome lower body exercises takes practice and determination.
If you want to improve your chances of executing these lifts successfully and dramatically improve your lift game, the tips we’ve covered here should have you lifting like a pro before you know it.
Take your time, learn proper form and technique, and practice!
About Michael Behnken
Mike Behnken is a personal trainer who holds multiple NASM certifications and a MS in Exercise Science. Mike loves fitness, travel, and photography among many other interests.